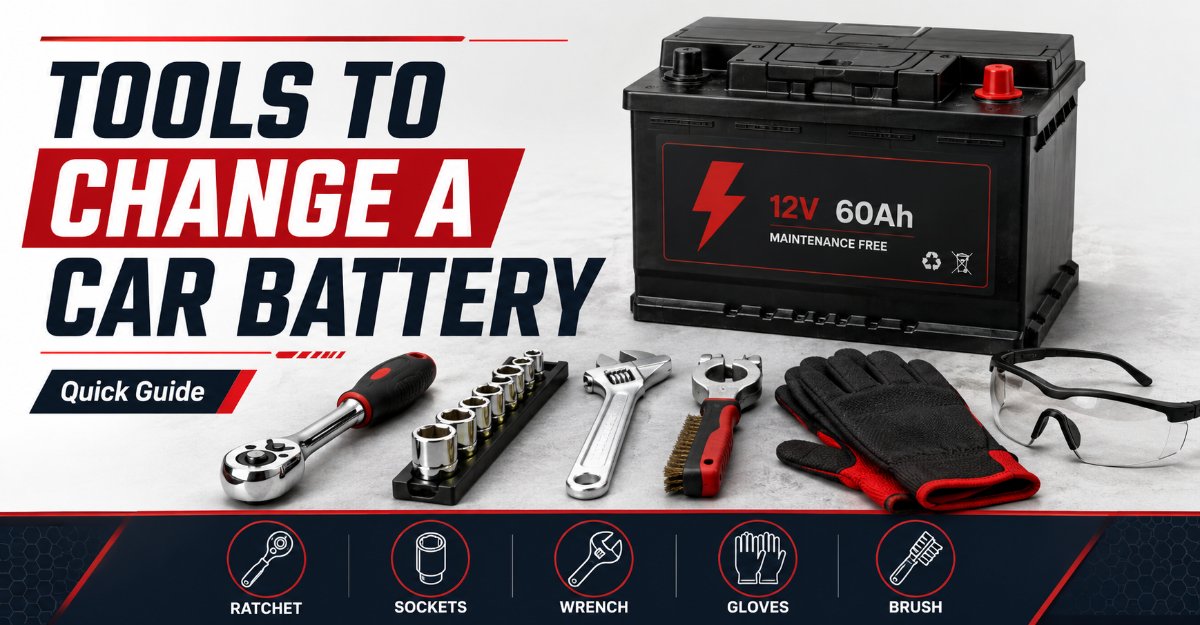
To change a car battery safely, you need a ratchet set with 10mm, 8mm, and 13mm sockets, a 10-inch extension bar, safety glasses, chemical-resistant nitrile gloves, a wire terminal cleaning brush, and dielectric grease. Modern vehicles built after 2010 also require an OBD2 memory saver and a battery registration scan tool.
At a Glance
- Standard Terminal Socket: A 10mm socket fits terminal clamps on roughly 80 percent of modern vehicles.
- Hold-Down Bolt Sockets: European and domestic vehicles typically use 13mm, 12mm, or 8mm sockets with a 10-inch extension bar to reach lower retention brackets.
- Side-Terminal Wrench: General Motors side-mount batteries require a 5/16-inch box wrench or specialized ratchet wrench.
- Safety Equipment: Non-negotiable protective gear includes ANSI Z87.1 safety glasses and 5-mil to 7-mil heavy nitrile gloves.
- Digital Calibration Tools: Post-2010 vehicles require an OBD2 scanner to reset the Battery Management System (BMS) and register the new battery unit.
What Exact Socket Wrench Sizes Do Most Car Batteries Require?
Most car battery replacements require three specific socket sizes: 10mm, 8mm, and 13mm. A 1/4-inch or 3/8-inch drive ratchet paired with a standard medium socket set will cover the majority of passenger vehicles on the road today.
TYPICAL BATTERY TERMINAL & HOLD-DOWN SOCKET SIZES
The 10mm socket is the universal standard for terminal post clamps across Asian brands such as Toyota, Honda, Nissan, and Hyundai, as well as modern Ford and Chevrolet top-post models. The 13mm socket is standard for securing the battery hold-down bracket at the base of the battery tray, particularly on European vehicles like BMW, Audi, and Volkswagen, as well as domestic trucks. You will also need a 10-inch to 12-inch socket extension rod because base hold-down bolts are located deep inside the engine bay where hand clearance is impossible.
What Essential Safety Gear Is Required When Changing a Car Battery?

Essential safety gear for changing a car battery includes ANSI Z87.1-approved safety glasses and 5-mil or 7-mil heavy-duty nitrile gloves. Working on automotive 12-volt systems carries direct risks of chemical burns from sulfuric acid residue and electrical arc flashes from accidental ground shorts.
Batteries naturally generate explosive hydrogen gas during operation, and older lead-acid units often vent acidic mist around terminal posts. Eye protection prevents acid splashes and debris from entering your eyes if a spark occurs. Thick chemical-resistant nitrile or latex gloves protect your hands from corroded copper sulfate powder and battery acid leaks. Avoid wearing metal jewelry, rings, or wristwatches during the procedure, as conductive metals instantly weld to vehicle metal if they touch a live positive terminal.
Why Do Modern Cars Require an OBD2 Scanner During a Battery Change?
Modern vehicles equipped with a Battery Management System (BMS) require an OBD2 scan tool with battery registration capabilities to reset the charging algorithm inside the Engine Control Unit (ECU). Auto manufacturers including BMW, Audi, Volkswagen, Ford, Volvo, and Mazda use BMS technology on most vehicles built after 2010.
As a lead-acid or AGM battery ages, its internal resistance increases. The BMS computer constantly increases alternator output voltage over time to compensate for this degradation. If you install a new battery without performing a digital BMS reset, the car computer assumes the old battery is still installed. It continues to output excessive charging voltage, which overheats the new battery, degrades its active plates, and shortens its operating life by up to 50 percent. The scan tool informs the vehicle computer of the new battery chemistry, amp-hour capacity, and brand.
What Is a Memory Saver and Do You Need One to Swap a Car Battery?
A 12-volt OBD2 memory saver is a backup power cable that feeds low-amp current into your car electrical system through the OBD2 port while the primary 12V battery is disconnected. You need a memory saver if you want to retain vehicle computer memory, radio security presets, drive-cycle data, power seat positions, and clock settings.
When a battery is removed without continuous power, the Engine Control Unit (ECU) loses its learned adaptive trim profiles for idle control and air-fuel mixture. This loss often causes rough idling, engine stalling, or temporary Check Engine lights for the first 30 to 50 miles of driving until the computer relearns operating parameters. On older Honda, Acura, and Nissan models, total power loss permanently locks the infotainment unit until a multi-digit anti-theft radio code is manually entered. Plugging a memory saver attached to an auxiliary 12V power source into the OBD2 port under the dash eliminates these disruptions entirely.
What Specialized Tools Are Needed for Side-Terminal or Hidden Batteries?
Side-terminal and hidden car batteries require specialized tools including a 5/16-inch box wrench, Torx star drivers (T25 to T40), a floor jack, and lug nut wrenches. Standard top-post socket sets cannot fit into the cramped quarters of non-traditional battery layouts.
General Motors vehicles utilizing side-terminal batteries require a 5/16-inch box wrench or an insulated, ratcheting side-terminal tool to avoid stripping thread pockets embedded in the battery casing. Vehicles with hidden batteries under the passenger seat or inside the trunk (such as Jeep Grand Cherokee, Mercedes-Benz, and BMW models) require Torx drivers and plastic trim-removal wedges to access the battery compartment. Vehicles with wheel-well battery placements, like the Dodge Journey, require a floor jack, jack stands, and a lug wrench to remove the front driver-side wheel and inner fender liner before the battery can be accessed.
Should You Disconnect the Positive or Negative Terminal First?
You must always disconnect the Negative (-) terminal first when removing a car battery. The negative terminal is typically covered in black casing or marked with a minus symbol.
SAFE BATTERY DISCONNECTION PROCEDURE
The entire metal chassis and engine block of your vehicle serve as the electrical ground connected directly to the negative terminal post. If your wrench accidentally contacts the steel body of the car while loosening the negative cable nut, nothing happens because both surfaces sit at the exact same electrical potential. However, if you attempt to remove the positive terminal first and your metal wrench touches any exposed frame metal, you complete a massive short circuit. This creates an immediate electrical arc that can melt hand tools, trigger battery explosion, or fry electronic control modules.
What Is the Correct Sequence for Installing a New Car Battery?
The correct sequence for installing a new car battery requires connecting the Positive (+) terminal first, followed by the Negative (-) terminal last. This process reverses the removal sequence to maintain short-circuit protection.
Place the new battery into the tray and secure the lower hold-down bracket using your socket wrench and extension bar to ensure zero physical movement. Slide the red positive cable clamp over the positive battery post, push it flush with the base of the post, and tighten the nut securely. Finish by connecting the black negative cable clamp to the negative battery post and tightening the fastener. Remembering the rule “Negative off first, Negative on last” keeps electrical work safe and prevents accidental shorting.
Can You Use an Impact Wrench or Power Tools on Battery Terminals?
No, you should never use impact wrenches, impact drivers, or high-torque power tools on car battery terminals or hold-down fasteners. Power tools deliver harsh rotational vibration and unchecked torque that easily destroy soft lead components.
Car battery posts and cable clamps are cast from soft lead alloy designed to yield under gentle manual force. The high-frequency hammer mechanism of an impact driver can crack the lead post casing, break internal plate connections inside the battery case, or strip the internal threads of side-terminal batteries. Hand ratchets and combination wrenches provide precise tactile feedback, allowing you to tighten hardware safely to the manufacturer specified torque without damaging battery integrity.
How Do You Safely Remove a Stuck or Heavily Corroded Battery Cable Clamp?
To remove a stuck or corroded terminal clamp safely, apply a neutralizing baking soda solution, spray penetrating oil, and use a specialized battery terminal puller tool. Never pry against the top casing of a battery with a screwdriver.
White or greenish powder buildup on terminal posts consists of corrosive copper sulfate or lead sulfate crystals created by hydrogen gas leakage. Mix two tablespoons of baking soda with one cup of warm water and pour it directly over the corrosion; the solution will foam rapidly as it neutralizes the acid residue. Scrape away heavy deposits with a stiff brush, apply penetrating oil around the clamp split, and allow it to soak for five minutes. If the clamp remains seized, attach a two-jaw micro terminal puller beneath the clamp and turn the center drive bolt to lift the clamp straight off the post without exerting destructive leverage on the battery casing.
How Do You Apply Terminal Cleaner, Brushes, and Dielectric Grease Properly?
Proper terminal maintenance requires scrubbing posts and clamp interiors with a 2-in-1 battery cleaning brush before applying a protective coat of dielectric grease or anti-corrosion spray. Clean metal-to-metal contact prevents electrical voltage drops.
Insert the female wire end of the cleaning brush over the lead battery post and twist it clockwise multiple times until the bare metal shines bright silver. Use the internal male wire brush end to scrub oxidation off the inner surface of the cable clamp. After tightening the terminal clamps down completely on the battery, smear a thin layer of dielectric grease or spray dedicated anti-corrosion film over the exterior of the connection. Dielectric grease blocks atmospheric moisture and oxygen from reaching the joint, preventing future corrosion without inhibiting electrical current flow across the tight contact point.
How Do You Know If Your Vehicle Requires an AGM or Flooded Battery?
Determine whether your vehicle requires an AGM (Absorbed Glass Mat) battery by reading the factory label on the installed unit or checking your owner manual specifications. Vehicles with engine Start-Stop technology or heavy electrical accessories require AGM chemistry.
AGM VS. FLOODED BATTERY COMPARISON
If your original battery bears the marking AGM, EFB, or VRLA, you must replace it with an AGM battery. Standard flooded lead-acid batteries cannot accept the rapid recharge cycles demanded by modern regenerative braking and Start-Stop systems, leading to battery failure within months. Conversely, if your car came factory-equipped with a standard flooded battery, upgrading to an AGM battery is fully compatible and provides superior cold-cranking power, faster recharge rates, and better resistance to extreme temperatures.
What Torque Spec Should Be Used When Tightening Battery Terminal Bolts?
Battery terminal clamp bolts should be tightened to a torque specification between 5 and 7 foot-pounds (60 to 84 inch-pounds). Hold-down tray bolts require slightly higher torque, typically 9 to 13 foot-pounds (108 to 156 inch-pounds).
Because lead terminal posts are soft, overtightening stretches the clamp ring and distorts the fastener threads, making future removals extremely difficult. Use a 1/4-inch drive torque wrench or a short hand ratchet held near the head. Tighten the clamp nut until the terminal clamp can no longer be twisted or rotated by hand on the lead post. If you can wiggle the connected cable back and forth on the terminal post, the connection is too loose and will cause resistance spikes, click-no-start symptoms, or alternator charging faults.
How Do You Safely Lift and Maneuver a Heavy Replacement Car Battery?
Safely maneuver a car battery by using a heavy-duty plastic battery carrying strap or grasping the built-in folding handles while maintaining proper lifting posture. Automotive batteries weigh between 30 and 60 pounds due to internal lead plates and liquid acid.
Do not attempt to lift a battery by grasping terminal posts directly, as this stresses internal post seals and leads to acid leaks. Fasten a universal clamp-on battery strap onto the casing edge if the unit lacks integrated plastic handles. Keep the battery upright at all times during transfer to prevent acid leaks from top vent caps. Bend your knees and hold the battery close to your torso when lifting it over the high fender lip of an engine compartment to protect your lower back from strain.
The Bottom Line
Replacing a car battery requires basic mechanical hand tools, appropriate safety equipment, and digital calibration equipment for modern vehicles. A 10mm socket, socket extension rod, wire cleaning brush, safety glasses, and dielectric grease cover physical installation on most cars. Remember to always disconnect the negative terminal first to eliminate short-circuit risks, and use an OBD2 scan tool to register the new unit if your car features a Battery Management System.


