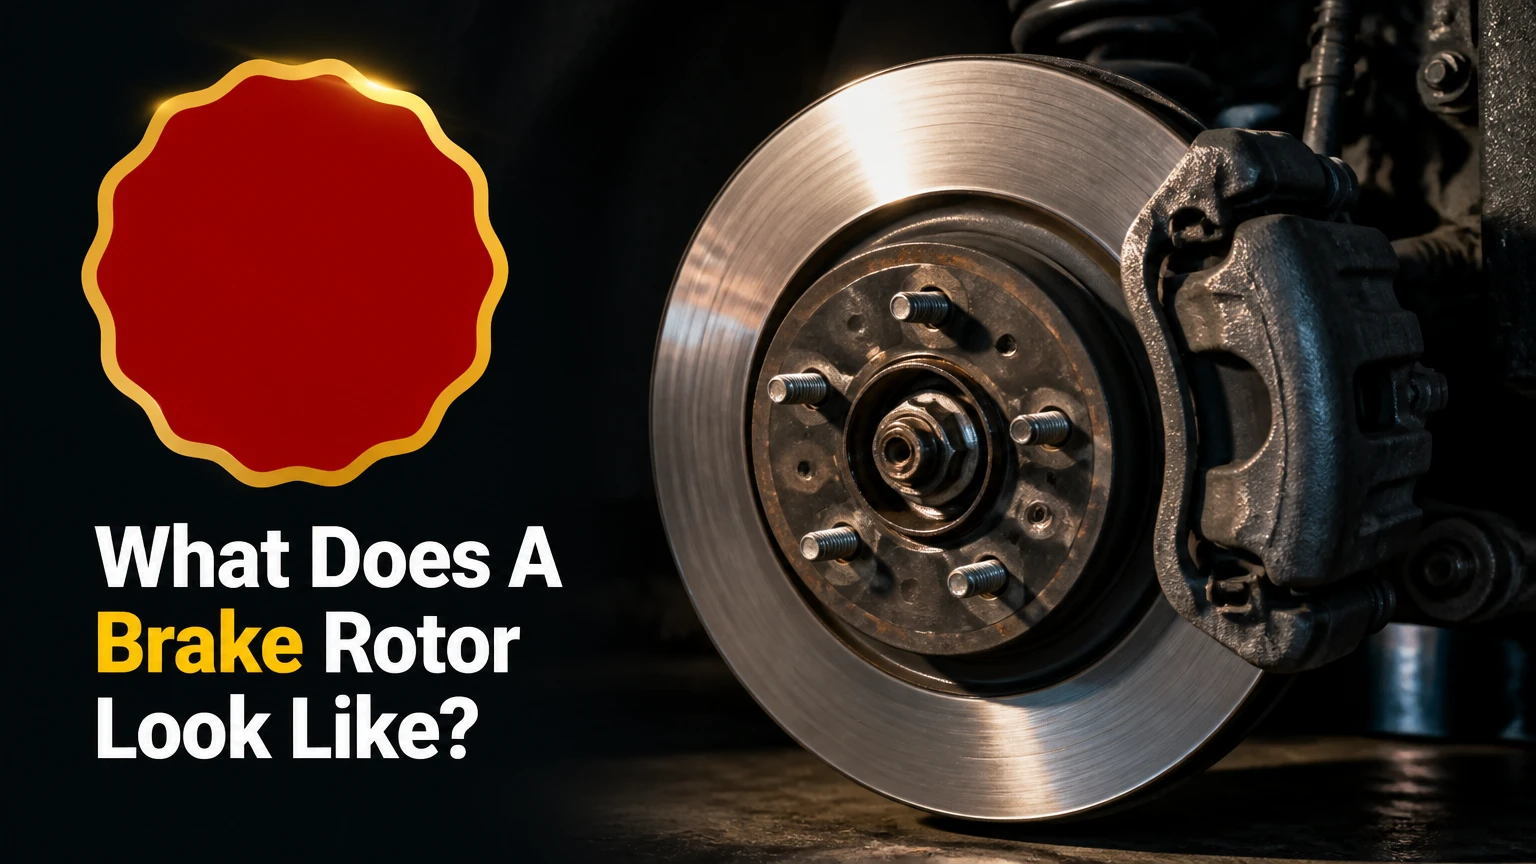
A brake rotor looks like a heavy, shiny, metallic circular platter with a raised cylindrical center and a perfectly flat outer ring. It resembles a miniature metallic top hat or a thick weightlifting plate bolted directly behind your vehicle’s wheel.
Key Facts / At a Glance:
- Primary material: Most brake rotors consist of heavy G3000 grade cast iron, weighing between 15 and 30 pounds each.
- Dimensional range: Standard passenger vehicle rotors measure 10 to 16 inches in diameter and 10mm to 38mm in thickness.
- Location: They sit directly behind the wheel spokes, bolted to the vehicle hub, and rotate at the exact speed of your tires.
- Operating temperature: Normal friction generates 300 to 400 degrees Fahrenheit, while heavy braking can push temperatures beyond 800 degrees.
- Minimum thickness: Every rotor features a factory-stamped minimum thickness number (usually 1mm to 2mm less than the new thickness) dictating when it requires replacement.
What Does A Brake Rotor Look Like Out Of The Box?
A brand new brake rotor looks like a flawless, silver metal disc with a highly machined finish. When you pull a fresh rotor out of its cardboard packaging, the friction surface will display fine, intersecting circular scratches known as a cross-hatch pattern. Manufacturers machine this pattern into the metal intentionally. The cross-hatch texture helps the new brake pads bed into the metal, transferring an even layer of friction material during the first few miles of driving.
New rotors also look wet or greasy. Factories coat bare cast iron rotors in a thick, sticky rust-preventative oil called cosmoline. This yellow or brown oil prevents the iron from rusting on cargo ships during transit. You must completely strip this oil away with an aerosol brake parts cleaner before installation. If you leave the oil on the friction surface, it will permanently contaminate your new brake pads and ruin their stopping ability.
Visual Differences in Factory Coatings
Not all new rotors look like bare, oiled iron. Premium aftermarket rotors often feature protective chemical coatings to prevent corrosion on the non-friction areas.
Zinc-plated rotors have a bright, silver, almost mirror-like finish across the entire unit. Geomet-coated rotors look matte gray and have a slightly textured, powdery appearance. Black electrophoretic deposition (E-coating) leaves the center hat and outer edges looking like they are painted with a thick, glossy black enamel. Once you drive the vehicle, the brake pads will immediately scrape the coating off the flat friction ring, but the center hat and cooling vanes will retain their coated color to prevent unsightly rust behind your alloy wheels.
The Physical Dimensions And Anatomy
A brake rotor consists of three primary physical zones. Each zone handles a specific mechanical stress during the braking process. Recognizing these parts helps you understand how the system manages heat and kinetic energy.
The center section is the hat. This raised cylindrical area fits tightly over the axle hub. The flat top of the hat contains one large center bore hole and four to eight smaller lug bolt holes. The lug bolts pass through these holes to secure both the rotor and the wheel to the vehicle hub.
The friction face is the wide, flat outer ring where the brake pads apply pressure. A rotor actually has two friction faces: one on the outside facing the wheel, and one on the inside facing the vehicle suspension. Both surfaces must remain perfectly flat and parallel.
In ventilated designs, cooling vanes sit sandwiched between the two friction faces. These internal metal ribs create a hollow channel inside the disc. As the wheel spins, the vanes act like a centrifugal pump. They pull cool air from the center of the hub and push it outward through the edges to dissipate extreme heat.
| Rotor Part Name | Visual Appearance | Material Composition | Primary Function |
|---|---|---|---|
| The Hat | Raised, cylindrical center section with 4-8 drilled holes. | Cast Iron, Aluminum (on 2-piece), or Carbon Ceramic. | Mounts the disc securely to the vehicle axle hub. |
| Friction Face | Flat, highly machined outer rings on both sides of the disc. | Milled G3000 Cast Iron or High-Carbon Alloy. | Provides the mating surface for brake pads to generate friction. |
| Cooling Vanes | Internal ribbed metal pillars or curved channels. | Cast Iron (molded as a single piece with the faces). | Pumps ambient air through the core to extract thermal energy. |
| Center Bore | Large perfectly circular hole in the exact middle of the hat. | Machined Cast Iron. | Centers the heavy disc perfectly on the hub to prevent vibration. |
How A Brake Rotor Converts Energy
Brake rotors function by converting the kinetic energy of a moving vehicle into thermal energy through friction. They serve as the foundational anchor of the modern disc brake system. The entire process relies on hydraulic pressure and mechanical clamping force.
When the driver presses the brake pedal, the brake master cylinder pressurizes hydraulic fluid. This fluid travels through steel lines and rubber hoses directly to the brake caliper bolted over the rotor. The fluid pressure forces one or more metal pistons inside the caliper to extend outward.
These pistons push two abrasive brake pads tightly against the spinning friction faces of the rotor. The intense physical clamping force generates massive amounts of friction. This friction slows the rotation of the heavy iron disc. Because the wheel bolts directly over the rotor, slowing the disc mathematically slows the tires, bringing the heavy vehicle to a controlled stop.
What Do The Different Types Of Rotors Look Like?
Brake rotors come in several distinct visual designs. Engineers modify the friction surface to manage heat, evacuate gases, or clear debris depending on the vehicle’s weight and intended use.
A blank or smooth rotor looks exactly like a flat, continuous iron ring. There are no holes, slots, or interruptions on the friction face. This is the factory standard for 90% of passenger cars. Smooth rotors offer the absolute maximum surface area for the brake pad to bite into. They run quietly, last the longest, and resist cracking under normal commuting conditions.
Solid rotors look incredibly thin compared to other types. They consist of a single, flat sheet of metal with no internal cooling gap. Manufacturers reserve these exclusively for the rear axles of lighter, front-wheel-drive vehicles where braking temperatures remain relatively low.
Ventilated rotors look very thick from the top edge. When you look down at the outer perimeter of the disc, you can clearly see the hollow internal gap and the structural cooling vanes separating the two friction faces. Almost all modern vehicles use ventilated rotors on the front axle, as the front brakes handle up to 70% of the vehicle’s stopping load.
Drilled rotors feature a pattern of small holes bored completely through the friction faces down into the internal cooling vanes. Originally designed for wet-weather racing, these holes give trapped water and hot brake gases an immediate escape route. While they look aggressive and sporty, the drilled holes weaken the iron structure. Heavy track use often causes tiny stress cracks to form around the holes.
Slotted rotors feature shallow, angled grooves carved across the friction face. These slots look like curved lines sweeping from the inner hub toward the outer edge. The slots act like a windshield wiper for the brake pads. As the disc spins, the sharp edge of the slot scrapes a micro-layer of glazed material off the brake pad, ensuring a fresh, abrasive bite every time you press the pedal.
| Rotor Design Type | Friction Surface Appearance | Ideal Vehicle Application | Thermal Management Characteristic |
|---|---|---|---|
| Blank / Smooth | Uninterrupted flat metal ring. | Daily commuters, standard sedans, budget builds. | Retains heat longer but offers maximum pad contact area. |
| Solid | Thin, single-piece metal disc. | Rear wheels of compact cars. | Very low thermal capacity; strictly for low-stress axles. |
| Ventilated | Thick edge profile with visible internal ribs. | Front wheels of all modern passenger vehicles. | Excellent internal airflow limits heat soaking on heavy vehicles. |
| Drilled | Symmetrical pattern of through-holes. | Premium sports cars, show cars, wet climates. | Evacuates gases instantly; prone to structural cracking at extreme temps. |
| Slotted | Shallow, angled grooves machined across the face. | Towing trucks, heavy SUVs, track racing. | Sweeps debris and pad glaze away; accelerates brake pad wear. |
| Drilled & Slotted | Combined holes and sweeping grooves. | High-performance custom builds and modified cars. | Aggressive initial bite; cannot be resurfaced on a brake lathe. |
Visual Differences Between Front And Rear Rotors
Front brake rotors look noticeably different from rear brake rotors when placed side by side. The front rotors are almost always larger in diameter and significantly thicker. Because the weight of a vehicle shifts forward violently during deceleration, the front brakes do the vast majority of the work. Front rotors require the thicker, ventilated design to survive the heat.
Rear rotors are usually much smaller and often feature a solid, non-ventilated design. Furthermore, rear rotors frequently incorporate a unique “drum-in-hat” design to accommodate the emergency parking brake. The center hat on these rear rotors looks much deeper and wider. Inside that deep hat, a secondary set of semi-circular brake shoes expands outward to lock the vehicle in place when parked.
What Does A Worn Brake Rotor Look Like?
A worn brake rotor looks noticeably degraded, discolored, and physically grooved compared to a fresh unit. Visual inspection provides immediate clues about the health of your braking system and the driving habits of the vehicle owner.
Deep circular grooves scoring the friction face indicate severe wear. This typically happens when the soft friction material on the brake pad wears away completely, exposing the hard steel backing plate. The steel plate violently grinds into the cast iron rotor, digging deep, shiny trenches resembling the grooves on a vinyl record. Once a rotor sustains deep scoring, it requires immediate replacement.
A prominent raised lip along the absolute outer edge of the disc indicates extensive long-term wear. Brake pads do not touch the very outer millimeter of the rotor. As thousands of miles of friction slowly erode the main contact area, that untouched outer edge remains at its original factory thickness. Running your finger from the center toward the edge will catch abruptly on this sharp, rusty ridge.
Blue discoloration across the friction surface indicates severe heat stress. When drivers ride the brakes down steep mountain passes or brake aggressively on race tracks, the iron superheats. This extreme temperature alters the metallurgy, leaving a dark blue or purple tint on the metal. Overheated rotors often develop hard spots called cementite, which cause a violent shudder in the steering wheel.
| Visual Wear Symptom | Physical Measurement / Feeling | Root Cause | Recommended Action |
|---|---|---|---|
| Deep Circular Scoring | Deep, sharp trenches you can catch a fingernail in. | Metal-to-metal contact from fully depleted brake pads. | Replace rotors and pads immediately. |
| Pronounced Outer Lip | A sharp, raised ridge on the extreme outer edge. | High mileage; normal friction erosion over 50,000+ miles. | Measure thickness; replace if below the stamped discard limit. |
| Blue/Purple Discoloration | Smooth surface, but visually tinted dark blue or rainbow. | Extreme thermal stress from towing or aggressive driving. | Replace rotors; upgrade to slotted designs for better cooling. |
| Heavy Surface Flaking | Thick chunks of rust peeling off the friction face. | Vehicle sat parked in a corrosive/salty environment for months. | Replace rotors; rust pitting destroys new brake pads instantly. |
Step-by-Step Visual Inspection Guide
You do not always need to remove the wheel to inspect the health of your brake rotors. With a flashlight and a good line of sight through your alloy wheel spokes, you can perform a basic diagnostic check in your driveway.
First, shine the flashlight directly onto the flat, shiny friction surface. Look for a uniform, dull silver appearance. If you see dark black spots or a patchy, uneven transfer of material, your brake pads are outgassing and leaving uneven deposits on the metal.
Second, reach through the wheel spokes and gently run your fingernail vertically across the flat surface from the hub toward the outer edge. Do this only when the vehicle has been parked for several hours and the metal is completely cold. The surface should feel relatively smooth. If your fingernail catches in deep, jagged grooves, the rotor is badly scored and requires replacement.
Third, check the outer edge for the wear lip. If the lip feels taller than the thickness of a heavy coin, the rotor has likely worn past its safe minimum thickness. Finally, look closely at the internal cooling vanes on the front rotors. If those hollow channels look completely packed with rust, mud, or debris, the rotor cannot cool itself and will eventually fail under heavy load.
How Long Do Brake Rotors Last?
Brake rotors typically last between 30,000 and 70,000 miles, depending entirely on vehicle weight, driving environment, and driver behavior. A lightweight commuter car driving mostly highway miles can easily push a set of premium rotors past 80,000 miles. Conversely, a heavy towing truck operating in mountainous terrain might destroy a set of cheap rotors in under 20,000 miles.
Mechanics measure rotor lifespan using a very specific metric: the discard thickness. Every rotor leaves the factory with a minimum safe thickness measurement stamped directly into the metal, usually on the edge of the hat. For example, a rotor might start at 28mm thick and feature a stamp reading “MIN THK 26.5MM”. Once a micrometer confirms the friction face has worn below 26.5mm, it becomes illegal and unsafe for a shop to reinstall that rotor.
From a cost perspective, standard blank rotors for passenger cars cost between $40 and $150 each if you purchase the parts yourself. Professional replacement at a dealership or independent shop ranges from $350 to $800 per axle. This professional cost includes two new rotors, a set of premium ceramic brake pads, hardware, and shop labor.
Expert Insights On Installation And Maintenance
Many premature rotor failures stem from basic installation errors rather than defective metal. As a practitioner, I see three specific mistakes ruin perfectly good rotors within the first 5,000 miles of use.
First, technicians often fail to clean the hub mating surface. When removing the old rotor, you will find a layer of crusty rust on the vehicle axle hub. If you do not scrub this rust away with a wire brush before sliding the new rotor on, the new disc will not sit perfectly flat. Even a millimeter of trapped rust pushes the rotor slightly off-axis, creating lateral runout. This runout causes the rotor to wobble, leading to severe pedal pulsation just a few months later.
Second, incorrect lug nut torque distorts the metal. Slamming the wheel back on with a powerful pneumatic impact gun applies uneven clamping force to the rotor hat. This uneven pressure physically bends the hot cast iron during your first heavy braking event. Always use a calibrated manual torque wrench and tighten the lug nuts in a strict star pattern to ensure perfectly even pressure distribution.
Third, skipping the bed-in procedure prevents proper friction mechanics. Modern brake pads do not stop the car by scraping bare iron. They stop the car by adhering to a microscopic layer of their own material transferred onto the rotor face. When you install new brakes, you must perform a series of six to eight aggressive slow-downs from 45 mph to 10 mph without coming to a complete stop. This intense heat bakes a smooth, even transfer layer of pad material onto the bare metal, ensuring quiet operation and maximum stopping power.
Frequently Asked Questions
Can you tell if a brake rotor is warped just by looking at it? No, you cannot see physical warping with the naked eye. The variations that cause steering wheel vibration are microscopic, usually measuring less than 0.002 inches. Mechanics must use a specialized tool called a dial indicator to measure the precise lateral runout of the disc while spinning it by hand.
Why do my new rotors have surface rust after it rains? The friction face of a brake rotor is bare, unprotected cast iron. When rain or heavy humidity hits the bare metal, a thin layer of orange flash rust forms almost instantly. This is entirely normal and harmless. The very first time you apply the brakes backing out of your driveway, the brake pads will effortlessly wipe the rust away.
What is the minimum thickness number stamped on the rotor? The minimum thickness specification represents the absolute lowest structural mass the rotor can safely maintain without overheating or cracking. Manufacturers stamp this metric, usually labeled as “MIN THK” followed by a millimeter measurement, onto the outer edge of the disc or the center hat. If the disc measures thinner than this number, it must go in the scrap pile.
Do directional brake rotors look different from standard ones? Yes, directional rotors feature internal cooling vanes that curve backward against the direction of rotation. If you look down into the edge gap, the pillars sweep backward to scoop air from the hub and fling it outward. You must install directional rotors on their designated side (driver or passenger) or the cooling system will work backward, trapping heat inside the brakes.
Can you spray WD-40 on a rusty brake rotor to clean it? Absolutely never apply WD-40, penetrating oil, or any petroleum-based lubricant to a brake rotor. These chemicals will immediately soak into the porous friction material of the brake pads, destroying their ability to generate friction. To clean a rotor, you must use a dedicated, fast-evaporating aerosol brake parts cleaner.
The Bottom Line
Understanding what a brake rotor looks like helps you monitor the health of your vehicle’s most critical safety system. Whether you are identifying the cross-hatch pattern on a brand-new blank disc, spotting the internal vanes of a ventilated upgrade, or diagnosing the deep scoring and blue heat marks of a failing component, visual inspection is your first line of defense. By familiarizing yourself with the physical anatomy and acknowledging the strict thickness limitations, you can avoid costly metal-to-metal damage and ensure your stopping power remains reliable in every driving condition.


